
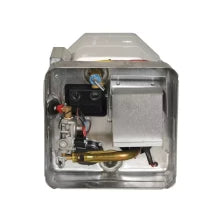
Water heater maintenance often gets overlooked until something goes wrong. Most RV owners focus on the obvious components—checking for leaks, testing the heating elements, or flushing the tank. However, there’s one small but critical component that quietly protects your entire system from premature failure: the anode rod.
This unassuming piece of metal does more than you might think, working around the clock to prevent costly damage. Understanding the role of an anode rod and why you need one in your water heater could save you hundreds of dollars and prevent unexpected breakdowns while you’re on the road.
The Role of an Anode Rod
The anode rod functions as a sacrificial component designed specifically to prevent rust and corrosion inside your RV water heater tank. Made from materials like magnesium, aluminum, or zinc, this rod attracts corrosive elements in the water that would otherwise attack the steel tank walls.
The process works through electrochemical reactions. When water enters your tank, it naturally contains minerals and dissolved substances that can cause corrosion. The anode rod, being more electrically active than the tank material, becomes the preferred target for these corrosive elements. As the rod deteriorates, it releases electrons that help neutralize the corrosive process affecting the tank walls.
This sacrificial protection extends far beyond simple rust prevention. The anode rod maintains the structural integrity of your entire water heating system. Without it, corrosive elements would gradually eat away at the tank walls, weakening the metal and creating potential failure points. The rod essentially trades its own lifespan to preserve the much more expensive water heater tank.

What Happens Without an Anode Rod?
Operating your RV water heater without a functioning anode rod sets the stage for multiple costly problems. Tank corrosion accelerates dramatically when protective measures aren’t in place. The steel walls begin developing rust spots that gradually expand and deepen over time.
Rusty water becomes one of the first visible signs of this deterioration. This contaminated water doesn’t just affect your drinking supply—it can damage other plumbing components, stain fixtures, and create unpleasant tastes and odors throughout your RV’s water system. The rust particles can also clog faucet aerators and showerheads, reducing water flow and requiring frequent cleaning or replacement.
The water heater’s lifespan drops significantly without proper anode rod protection. A well-maintained unit might last 8-12 years, but tanks exposed to unchecked corrosion often fail within 3-5 years. This premature failure typically manifests as small leaks that gradually worsen, eventually requiring complete unit replacement.
The financial implications extend beyond the water heater cost alone. Emergency replacements during travel can be expensive and inconvenient, often requiring expensive service calls or potential towing to repair facilities. Additionally, water damage from a failed tank can affect surrounding cabinetry, flooring, and electrical components, multiplying repair costs substantially.
Why Regular Maintenance Matters
Anode rods don’t last forever—they’re designed to deteriorate as they protect your tank. Most rods need replacement every 1-3 years, depending on water quality, usage patterns, and the specific type of rod installed. Hard water accelerates rod consumption, while softer water allows rods to last longer.
Regular inspections help determine when replacement becomes necessary. A severely corroded rod, reduced to a thin wire core, or one heavily encrusted with mineral deposits can no longer provide adequate protection. Waiting until complete failure occurs leaves your tank vulnerable to damage during the period between rod failure and replacement.
Neglecting this small component creates a cascade of problems that grow exponentially over time. What starts as a $20-40 anode rod replacement can escalate into a $800-1500 water heater replacement, plus potential additional damage to surrounding systems. The mathematics clearly favor proactive maintenance over reactive repairs.
Water quality variations across different camping locations add another layer of complexity. Some regions have particularly aggressive water chemistry that accelerates anode rod consumption. RV owners who frequently travel through areas with high mineral content or unusual pH levels may need more frequent inspections and replacements.

How to Ensure Your Anode Rod Is Doing Its Job
Checking your anode rod requires basic tools and safety precautions. Start by turning off the water heater’s power and allowing the tank to cool completely. Drain the tank to prevent spillage, then locate the anode rod access point—typically a hex-head plug on top of the unit or sometimes on the side.
Removal typically requires a socket wrench or box-end wrench that fits the hex head. Some rods may be tight due to mineral buildup or threading corrosion, requiring penetrating oil and patience. Once removed, carefully inspect the rod’s condition. Healthy rods show minimal corrosion and retain most of their original diameter. Rods requiring replacement typically show heavy corrosion, significant diameter reduction, or core wire exposure.
Replacement involves selecting the appropriate rod type for your specific water conditions and heater model. Magnesium rods work best in softer water conditions, while aluminum rods perform better in harder water. Zinc rods offer a middle-ground option that works well in most situations. Some manufacturers offer powered anode systems that use electrical current to provide protection without rod consumption.
Professional consultation becomes valuable when dealing with unusual water conditions or complex installations. Experienced technicians can recommend optimal rod types and replacement intervals based on your specific usage patterns and travel destinations. They can also identify potential issues with tank condition or installation problems that might affect rod performance.
Something to remember during this process is that thread sealant application during installation prevents leaks and makes future removal easier. Use thread compound rated for potable water applications, applying a thin layer to the threads before installation. Proper torque specification prevents over-tightening that could damage the tank threads while ensuring adequate sealing.
What To Do If You Don’t Have One
Now that you know why you need an anode rod in your RV water heater, it’s time to get yourself one. Make sure the one you buy is compatible with your model of water heater. Also, if you’ve already waited too long, there’s a chance that the damage has already been done to your unit. In this case, be sure to buy a new RV water heater and an anode rod for it. This time around, be sure to keep a fresh one on hand at all times to ensure you get the most use out of your water heater as possible.


Comentarios (0)
No hay comentarios todavía. Sé el primero en comentar.