6 products
6 products
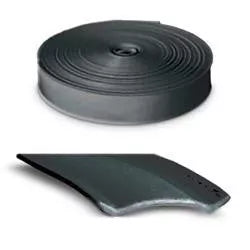
RV vinyl trim insert snaps into the aluminum awning rail or screw channel that runs along the exterior seams of your camper, covering the screw heads and sealing the joint against water and UV. It is the finishing strip you see at the roof line, slide-out edges, and corner trim on most travel trailers and motorhomes. Replacement is typically driven by cracking, fading, or shrinkage that pulls the insert away from the rail.
Measure each run of exposed aluminum rail on your RV in linear feet, then add roughly 5% for trim waste and the small overlap at corners and end caps. Most full RVs use between 80 and 150 feet of insert depending on length and slide-out count. Confirm the channel width on your existing rail before ordering, since insert profiles are not universal across manufacturers.
Pull the old insert out of the rail by hand or with pliers, clean the channel of dirt and old sealant, then feed the new strip into the track starting at one end. Working in warm weather (70°F or above) makes the vinyl flexible and easier to seat. Trim the ends flush with a sharp utility knife and cap with the appropriate corner molding. For related exterior repairs, see our Icon Premium Skylights and Ventline Vent accessories.
Cracked trim insert is often a signal that other sun-exposed components need attention. Inspect roof vents, skylight domes, and awning hardware while you have a ladder out, and look at the patio area for wear as well. Browse RV patio mats and our broader RV electronics selection for related maintenance items. If you need help confirming the right insert profile for your rig, text or call our team at 817-984-1852.
The right product, at the right price, with outstanding customer service.
5100 Airport Freeway
Fort Worth, TX 76117
817-984-1852
6314 Airport Freeway Suite C
Haltom City, TX 76117
Text us at 817-984-1852 (for fastest response)
Warehouse Hours
Monday: 9:00am - 4:00pm
Tuesday: 9:00am - 4:00pm
Wednesday: 9:00am - 4:00pm
Thursday: 9:00am - 4:00pm
Friday: 9:00am - 4:00pm
Saturday: 9:00am - 12:00pm
Sunday: Closed

Closed
Closing at 4pm
Closing at 4pm
Closing at 4pm
Closing at 4pm
Closing at 4pm
Closing at 1pm
5100 Airport Freeway
Fort Worth, TX 76117
Dealership Hours
Monday: 8:00am - 6:00pm
Tuesday: 8:00am - 6:00pm
Wednesday: 8:00am - 6:00pm
Thursday: 8:00am - 6:00pm
Friday: 8:00am - 6:00pm
Saturday: 9:00am - 5:00pm
Sunday: Closed

Closed
Closing at 6pm
Closing at 6pm
Closing at 6pm
Closing at 6pm
Closing at 6pm
Closing at 5pm
| Furnace | Model | Replacement Core |
| NT-16S | 2009 | Stock# 2611A, Model # RP-16NQ |
| NT-16S | 2420 | Stock# 2611A, Model # RP-16NQ |
| - | - | - |
| NT-16SQ | 2425 | Stock# 2611A, Model # RP-16NQ |
| NT-16SQ | 2426 | Stock# 2611A, Model # RP-16NQ |
| NT-16SQ | 2444 | Stock# 2611A, Model # RP-16NQ |
| NT-16SQ | 2445 | Stock# 2611A, Model # RP-16NQ |
| - | - | - |
| NT-20S | 2019 | Stock# 2611A, Model # RP-16NQ |
| NT-20S | 2281 | Stock# 2611A, Model # RP-16NQ |
| - | - | - |
| NT-20SQ | 2432 | Stock# 2611A, Model# RP-16NQ |
| NT-20SQ | 2433A | Stock# 2611A, Model# RP-16NQ |
| NT-20SQ | 2450A | Stock# 2611A, Model# RP-16NQ |
| NT-20SQ | 2425A | Stock# 2611A, Model# RP-16NQ |
| - | - | - |
| NT-30SP | 2060 | Stock# 2613A, Model# RP-30N |
| NT-30SP | 2373 | Stock# 2613A, Model# RP-30N |
| NT-30SP | 2453 | Stock# 2613A, Model# RP-30N |
| - | - | - |
| NT-34SP | 2603 | Stock# 2613A, Model# RP-30N |
| NT-34SP | 2374 | Stock# 2613A, Model# RP-30N |
| NT-34SP | 2454 | Stock# 2613A, Model# RP-30N |
| - | - | - |
| NT-40 | 2051 | Stock# 2614A, Model# RP-40N |
| NT-40 | 2455 | Stock# 2614A, Model# RP-40N |
| - | - | - |
| P-40 | 2230 | Stock# 2615A, Model# RP-40P |
| P-40 | 2456 | Stock# 2615A, Model# RP-40P |
| - | - | - |
| NT-16SEQ | 2017 | Stock# 2612A, Model# RP-16NEQ |
| NT-16SEQ | 2314 | Stock# 2612A, Model# RP-16NEQ |
| NT-16SEQ | 2315 | Stock# 2612A, Model# RP-16NEQ |
| NT-16SEQ | 2316 | Stock# 2612A, Model# RP-16NEQ |
| NT-16SEQ | 2364 | Stock# 2612A, Model# RP-16NEQ |
| NT-16SEQ | 2375 | Stock# 2612A, Model# RP-16NEQ |
| NT-16SEQ | 2380 | Stock# 2612A, Model# RP-16NEQ |
| NT-16SEQ | 2427 | Stock# 2612A, Model# RP-16NEQ |
| NT-16SEQ | 2428 | Stock# 2612A, Model# RP-16NEQ |
| NT-16SEQ | 2429 | Stock# 2612A, Model# RP-16NEQ |
| NT-16SEQ | 2431 | Stock# 2612A, Model# RP-16NEQ |
| NT-16SEQ | 2438 | Stock# 2612A, Model# RP-16NEQ |
| NT-16SEQ | 2439 | Stock# 2612A, Model# RP-16NEQ |
| NT-16SEQ | 2440 | Stock# 2612A, Model# RP-16NEQ |
| NT-16SEQ | 2441 | Stock# 2612A, Model# RP-16NEQ |
| NT-16SEQ | 2442 | Stock# 2612A, Model# RP-16NEQ |
| NT-16SEQ | 2443 | Stock# 2612A, Model# RP-16NEQ |
| NT-16SEQ | 2500 | Stock# 2612A, Model# RP-16NEQ |
| NT-16SEQ | 2503 | Stock# 2612A, Model# RP-16NEQ |
| NT-16SEQ | 2505 | Stock# 2612A, Model# RP-16NEQ |
| NT-16SEQ | 2507 | Stock# 2612A, Model# RP-16NEQ |
| - | - | - |
| NT-20SEQ | 2021 | Stock# 2612A, Model# RP-16NEQ |
| NT-20SEQ | 2307 | Stock# 2612A, Model# RP-16NEQ |
| NT-20SEQ | 2347 | Stock# 2612A, Model# RP-16NEQ |
| NT-20SEQ | 2348 | Stock# 2612A, Model# RP-16NEQ |
| NT-20SEQ | 2349 | Stock# 2612A, Model# RP-16NEQ |
| NT-20SEQ | 2435 | Stock# 2612A, Model# RP-16NEQ |
| NT-20SEQ | 2436 | Stock# 2612A, Model# RP-16NEQ |
| NT-20SEQ | 2437 | Stock# 2612A, Model# RP-16NEQ |
| NT-20SEQ | 2446 | Stock# 2612A, Model# RP-16NEQ |
| NT-20SEQ | 2447 | Stock# 2612A, Model# RP-16NEQ |
| NT-20SEQ | 2448 | Stock# 2612A, Model# RP-16NEQ |
| NT-20SEQ | 2449 | Stock# 2612A, Model# RP-16NEQ |
| NT-20SEQ | 2501 | Stock# 2612A, Model# RP-16NEQ |
| NT-20SEQ | 2504 | Stock# 2612A, Model# RP-16NEQ |
| NT-20SEQ | 2506 | Stock# 2612A, Model# RP-16NEQ |
| - | - | - |
| SF-20 | 2324 | Stock# 2605A, Model# RP-20Q |
| SF-20 | 2381 | Stock# 2605A, Model# RP-20Q |
| - | - | - |
| SF-20Q | 2382 | Stock# 2605A, Model# RP-20Q |
| SF-20Q | 2385 | Stock# 2605A, Model# RP-20Q |
| SF-20Q | 2386 | Stock# 2605A, Model# RP-20Q |
| - | - | - |
| SF-20F | 2329 | Stock# 2606A, Model# RP-20FQ |
| - | - | - |
| SF-20FQ | 2389 | Stock# 2606A, Model# RP-20FQ |
| SF-20FQ | 2325 | Stock# 2606A, Model# RP-20FQ |
| - | - | - |
| SF-25 | 2320 | Stock# 2607A, Model# RP-30Q |
| SF-25 | 2325 | Stock# 2607A, Model# RP-30Q |
| - | - | - |
| SF-25Q | 2383 | Stock# 2607A, Model# RP-30Q |
| SF-25Q | 2387 | Stock# 2607A, Model# RP-30Q |
| - | - | - |
| SF-25F | 2330 | Stock# 2608A, Model# RP-30FQ |
| - | - | - |
| SF-25FQ | 2390 | Stock# 2608A, Model# RP-30FQ |
| SF-25FQ | 2467 | Stock# 2608A, Model# RP-30FQ |
| - | - | - |
| SF-30 | 2321 | Stock# 2607A, Model# RP-30Q |
| SF-30 | 2326 | Stock# 2607A, Model# RP-30Q |
| SF-30 | 2376 | Stock# 2607A, Model# RP-30Q |
| - | - | - |
| SF-30Q | 2384 | Stock# 2607A, Model# RP-30Q |
| SF-30Q | 2388 | Stock# 2607A, Model# RP-30Q |
| SF-30Q | 2481 | Stock# 2607A, Model# RP-30Q |
| SF-30Q | 2481 | Stock# 2607A, Model# RP-30Q |
| - | - | - |
| SF-30F | 2331 | Stock# 2608A, Model# RP-30FQ |
| - | - | - |
| SF-30FQ | 2391 | Stock# 2608A, Model# RP-30FQ |
| SF-30FQ | 2469 | Stock# 2608A, Model# RP-30FQ |
| SF-30FQ | 2484 | Stock# 2608A, Model# RP-30FQ |
| - | - | - |
| SF-35 | 2322 | Stock# 2609A, Model# RP-35Q |
| SF-35 | 2327 | Stock# 2609A, Model# RP-35Q |
| - | - | - |
| SF-35Q | 2398 | Stock# 2609A, Model# RP-35Q |
| SF-35Q | 2414 | Stock# 2609A, Model# RP-35Q |
| - | - | - |
| SF-35F | 2302 | Stock# 2610A, Model# RP-35FQ |
| SF-35F | 2332 | Stock# 2610A, Model# RP-35FQ |
| - | - | - |
| SF-35FQ | 2400 | Stock# 2610A, Model# RP-35FQ |
| - | - | - |
| SF-42 | 2323 | Stock# 2609A, Model# RP-35Q |
| SF-42 | 2328 | Stock# 2609A, Model# RP-35Q |
| - | - | - |
| SF-42Q | 2399 | Stock# 2609A, Model# RP-35Q |
| SF-42Q | 2415 | Stock# 2609A, Model# RP-35Q |
| SF-42Q | 2482 | Stock# 2609A, Model# RP-35Q |
| - | - | - |
| SF-42F | 2333 | Stock# 2610A, Model# RP-35FQ |
| - | - | - |
| SF-42FQ | 2401 | Stock# 2610A, Model# RP-35FQ |