
Your RV’s electrical system is the backbone of your mobile lifestyle, powering everything from lights and appliances to chargers for your devices. At the heart of this system is the power converter. This essential component keeps your RV functioning smoothly by transforming AC power from a shore connection or generator into DC power needed to charge your battery and run interior electronics.
Over time, however, this crucial device can fail, jeopardizing your motorhome’s performance and potentially leaving you without power when you need it most. Recognizing the signs that your RV power converter needs a replacement can save you from unnecessary inconvenience and costly repairs in the long run, so it’s worth learning about them now.
Signs of a Failing Power Converter
Since an early diagnosis of power converter issues can prevent further complications in your RV’s electrical system, it’s crucial to be aware of all the things that could go wrong.
Weak Interior Lights
One of the most common signs of a failing power converter is dim or flickering interior lights. When the converter isn’t operating at full capacity, it might struggle to supply efficient power to DC circuits, resulting in inconsistent lighting.
Reduced Battery Charge
Another early symptom to look out for is a rapidly declining or weak battery charge. If your RV house batteries aren’t holding a charge as well as they used to, the power converter might not be charging them adequately.
Appliance Interruptions
Appliance malfunctions are yet another telltale sign. Since many motorhome appliances like refrigerators, water heaters, and ventilation fans depend on the converter for steady electrical power, interruptions in their functioning can indicate converter failure.
Overheating, Burning Smell, or Noises
Some RV owners might also notice a burning smell or unusual overheating near the converter unit, both of which should be addressed immediately, as they could indicate electrical damage or short circuits. Unusual buzzing, humming, or clicking noises coming from the converter are also typical symptoms of wear or internal malfunction.
Delayed recognition of these issues can escalate problems, potentially damaging other components of your RV’s electrical system. Promptly addressing suspected converter issues can save both time and money while upholding vehicle safety.

DIY Testing for Power Converter Issues
Before jumping to conclusions about replacing your power converter, it’s wise to confirm the problem through a series of DIY tests.
Wiring Inspection
First, inspect visible connections and wiring near the power converter. Look for obvious damage, such as frayed or burnt wires, as these could disrupt the power supply. Confirm that the shore power connection or generator output is stable. Sometimes, the issue might lie with the external power source rather than the converter itself.
DC Power Testing
Next, use a multimeter to measure the DC output of the converter. When operating correctly, the converter should produce around 12 to 14 volts of DC power. To test this, connect the multimeter to the converter’s output terminals while it’s plugged into a power source. If the voltage meter reads below 12 volts or fluctuates rapidly, this could confirm that the converter is failing to provide an adequate charge to the RV’s battery system.
Isolate the Battery
Another simple test involves isolating the battery from the converter to check whether onboard electrical items can still function on converter power. Turn off the battery supply, leaving only the shore or generator power connected, and observe how the internal systems, such as lights or fans, behave. If these systems are nonfunctional despite a stable AC power connection, the converter is likely malfunctioning.
Run Diagnostics
Finally, if your system includes software diagnostics, check for error codes on your RV’s control panel. Many modern motorhomes provide fault indicators or alerts if the power converter experiences operational issues. If you’re still unsure after DIY testing, you should consider consulting a licensed RV technician. They can provide a correct diagnosis before proceeding with repairs.

The Process of Replacing an RV Power Converter
Of course, diagnosing power converter issues is only a small part of this process. You still need to put in an RV power converter replacement. Fortunately, doing so is a fairly straightforward process.
Choose a New Converter
Before you get started, though, you need to find the new power converter that’ll replace your old one. United RV Center is here to help with that. With our large selection of RV converter replacements, you can find the perfect one for your needs.
When selecting a new power converter, it must match the existing unit in terms of capacity and compatibility with the RV’s electrical layout. Consider factors such as amperage rating, type of appliances supported, and whether the converter meets additional needs, such as smart charging functions for lithium-ion batteries or enhanced surge protection. Installing a higher-quality unit may offer added efficiency and durability, making it a worthwhile upgrade for regular RV users.
Disconnect Power
Once you have your replacement converter, the first and most important step is disconnecting all power sources from your RV electrical system. Unplug the RV from any shore power connection, turn off the generator, and disconnect the house batteries. Removing the risk of accidental electrocution or electrical surges is crucial before handling internal components.
Access the Converter
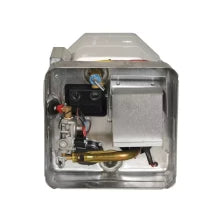
Next, locate the converter, which is typically housed near the electrical control panel or breaker box. Remove the panel surrounding the converter to access it, then unscrew or detach any mounting brackets or screws holding the unit in place. Label any wires connected to the converter before detaching them to help guide proper reconnection later. Once you’ve removed the old converter, inspect the remaining wiring and surrounding area for signs of heat damage or excessive wear.
Install the Replacement Converter
To install the new converter, reconnect the labeled wires to their corresponding terminals on the replacement unit. Secure the new converter in place using brackets, screws, or other mounting mechanisms. Once properly installed, double-check all electrical connections, then gradually reintroduce power by connecting the batteries, then the RV into shore or generator power. Switch on key systems to test functionality, checking that DC circuits and battery-charging processes are operational. If all systems are running smoothly, your replacement is complete.
While some motorhome owners prefer the hands-on approach of replacing a converter themselves, you don’t have to do it alone. Enlisting the help of a professional technician can assure accuracy and peace of mind. Regardless of who performs the replacement, keeping your RV’s power converter in good health is an investment in the overall longevity and reliability of your vehicle’s electrical components.


Comments (0)
There are no comments for this article. Be the first one to leave a message!