
When you finally park your RV after a long day of traveling, one of the first things you’ll likely do is open up your slide outs. These provide valuable extra space and comfort inside of your RV, but if you want to keep your camper well-insulated, you’ll need to ensure they’re properly sealed.
If you haven’t thought about the seal of your slide outs before, this guide will help you understand why sealing is crucial, as well as everything else you should know about sealing your RV slide out. That way, you’ll be prepared for anything regarding this part of your camper.
Why Sealing Your RV Slide Out Is Important
Your RV’s slide out may be one of its best features, but it’s also one of the most vulnerable. Without proper sealing, slide outs can invite a range of problems that could negatively impact both functionality and comfort.
Prevent Water Damage
One of the most significant threats to your RV’s integrity is water infiltration. When slide outs aren’t properly sealed, rainwater can seep into the gaps between the slide and the main body of the RV. Over time, this leads to rot, mold, and costly structural damage. A well-sealed slide out provides a watertight barrier, protecting the interior from moisture.
Improve Insulation
RV living is all about comfort, whether you’re camping in the summer or navigating cooler climates. Improper sealing can allow heat to escape in the winter or hot air to enter in the summer, making it harder to maintain an ideal temperature inside your RV. Sealing keeps your RV insulated, improving efficiency and reducing the strain on your heating and air conditioning systems.
Keep Pests Out
Tiny critters like ants, spiders, and rodents are opportunistic and often exploit any openings between your slide out and RV body. Sealing prevents these pests from entering your space, ensuring that you and your belongings are safe and comfortable.
Reduce Maintenance Costs
Regularly sealing your RV slide out can extend its lifespan and prevent major issues from developing. These preventive measures save money in the long run by reducing the need for costly repairs.

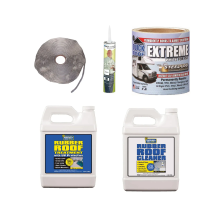
Types of Sealants for RV Slide Outs
Choosing the right sealant is just as important as applying it correctly. Slide outs require durable, flexible, and weatherproof sealants for long-lasting protection. Here are the main types of sealants commonly used for RV slide outs.
Silicone Sealants
Silicone sealants are popular for their extreme flexibility and waterproofing capabilities. They are resistant to cracking, making them a great option for RV surfaces that expand and contract under changing temperatures. However, they are less effective on heavy structural repairs due to their limited adhesion to some surfaces.
Acrylic Latex Sealants
Acrylic latex sealants are affordable, easy to apply, and paintable, making them a great choice for aesthetic touch-ups. These sealants, however, may not be as durable as silicone and are best for small cracks and gaps.
Polyurethane Caulks
Polyurethane caulks are known for their strong adhesion and durability. They adhere well to a wide variety of materials, including metal, wood, and fiberglass, making them ideal for RV applications. However, they can be harder to work with than silicone or acrylic sealants.
RV-Specific Sealants
Many manufacturers produce sealants specifically designed for RVs. These include a wide variety of options, all of which are trusted by RV owners for their UV resistance, flexibility, and long-lasting performance. These types of RV slide out parts are ideal since they’re made specifically for this portion of your camper.
Step-by-Step Guide to Sealing Your RV Slide Out
Now that you know why sealing is essential and have chosen the right sealant, follow this detailed guide to properly seal your RV slide out.
Step 1: Gather Your Supplies
Before beginning, ensure you have all the necessary tools and materials, including the sealant, a caulking gun, solvent cleaner, a plastic scraper, painter’s tape, and a clean rag.
Step 2: Clean the Slide Out Area
A successful seal starts with a clean surface. If old sealants are still present, scrape off as much as possible using a plastic scraper. Clean the area thoroughly with solvent-based cleaner to remove dirt, grease, and any leftover residue. Allow the area to dry completely before proceeding.
Step 3: Apply Painter’s Tape
To achieve a clean application line, use painter’s tape to mark the edges where the sealant will be applied. This step prevents sealant from smudging onto other areas of your RV.
Step 4: Apply the Sealant
Load your sealant into the caulking gun and start applying it along the seams and gaps of the slide out. Work slowly and carefully to ensure even coverage. Avoid applying too much sealant at once, as this can lead to an untidy finish or uneven drying.
Step 5: Smooth the Sealant
Once the sealant is applied, smooth it using your gloved finger or a specialized caulk smoother tool. This ensures the sealant gets into any tiny crevices and provides a clean, professional finish.
Step 6: Allow the Sealant to Dry
Follow the manufacturer’s instructions for drying and curing times. Depending on the type of sealant used and current weather conditions, drying may take anywhere from 24 to 48 hours. Avoid retracting or extending the slide out during this time.

Common Mistakes to Avoid
While sealing your RV slide out is a straightforward task, there’s more you need to know about sealing your RV slide out, and that’s the several pitfalls you’ll want to steer clear of. Avoiding these will help ensure a successful and lasting job.
Mistake 1: Not Preparing the Surface
Skipping the cleaning and prepping the slide out surface is one of the most common sealing mistakes. Without a clean base, the sealant won’t adhere properly, resulting in gaps and inefficiencies. Take the extra time to thoroughly clean and dry the surface before applying the sealant.
Mistake 2: Using the Wrong Sealant
Not all sealants are created equal. Using indoor caulks or generic hardware store seals may compromise the durability and weather resistance of your slide out seal. Always choose a sealant that is specifically designed for RV use.
Mistake 3: Overlooking Small Cracks
Even the tiniest cracks and gaps in your slide out’s seams can lead to significant issues if left unsealed. Look closely and cover every gap, no matter how minor it seems.
Mistake 4: Applying Too Much Sealant
A thick, uneven layer of sealant may take longer to dry and attract dirt and debris. It’s better to work in thin, consistent lines for a clean and reliable seal.
Mistake 5: Ignoring Regular Maintenance
Properly sealing your RV slide out once doesn’t mean you won’t have to do it again. Inspect seals regularly and reapply sealant when you detect signs of wear, such as cracks or separation.


Comments (0)
There are no comments for this article. Be the first one to leave a message!