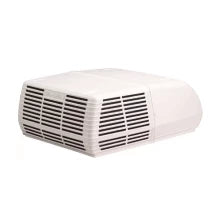
If you’re someone who loves nothing more than exploring in your RV, then you know that comfort is key when you’re on the road. One piece of equipment that significantly contributes to that comfort, especially during hot summer adventures, is your air conditioner. However, like any vital system in your RV, it requires regular care to ensure optimal performance and longevity. If you’re unsure where to start, this guide will walk you through everything you need to know about maintaining your RV air conditioner.
Understanding the Components

Before you can effectively take care of your RV air conditioner, you must first understand its basic components. While specific models may vary slightly, most RV air conditioners consist of the following parts.
Compressor
This is the heart of your air conditioner, responsible for pressurizing and circulating refrigerant to remove heat from the air. If your compressor fails, the entire cooling process comes to a halt.
Evaporator Coils
These coils work by absorbing heat from the air inside your RV. Clean evaporator coils are critical for effective cooling.
Condenser Coils
Condenser coils release the heat absorbed from inside the RV to the external environment. Similar to the evaporator coils, they must remain clean to function efficiently.
Air Filters
These filters trap dirt, dust, and debris to prevent them from clogging internal components. They significantly affect the air quality inside your RV.
Fans and Blowers
These components circulate air over the coils and throughout your RV. Malfunctioning fans can diminish airflow, reducing the system’s cooling capability.
Thermostat and Control Panel
These regulate the temperature within your RV by controlling how the air conditioner operates. Issues here can lead to temperature inconsistencies or system failures.
By knowing what these parts are and what they do, you can identify and address potential problems during maintenance or when troubleshooting where an issue is coming from.
Regular Maintenance Checklist
Like with many pieces of equipment, performing regular maintenance on an RV air conditioner can significantly extend its lifespan and prevent costly repairs. If you want to take the steps needed to ensure yours lasts for the long haul, here’s a comprehensive checklist for what you should do to maintain your system.
1. Clean or Replace Air Filters
You should try to make sure you check the air filters every month during periods of frequent use. A dirty filter restricts airflow, reduces cooling efficiency, and strains the system. Luckily, you can clean many air conditioner filters with warm water and mild detergent. If your filter shows signs of wear or damage, it’ll be better to replace it.
2. Inspect and Clean the Coils
Dirt and debris can accumulate on the evaporator and condenser coils, impairing heat transfer. Clean these coils at least once a year using a soft brush or a vacuum. Be gentle to avoid bending the delicate fins.
3. Check the Drip Pan and Drain Line
Over time, the drip pan can collect moisture that leads to mold or algae growth, causing the drain line to become clogged. Clear any blockages by cleaning the area with a mixture of vinegar and water.
4. Tighten Electrical Connections
Loose electrical connections can cause power loss or system malfunctions. Use a screwdriver to tighten these connections and visually inspect for signs of damage, such as frayed wires. Replace these parts as needed.
5. Lubricate the Fan Motor
If your RV’s air conditioner has a fan motor with lubrication points, apply a few drops of specific oil (as indicated in the owner’s manual) to keep it running smoothly and reduce wear. Be sure not to add too much, and don’t apply any oil to fans that don’t require it.
6. Inspect for Leaks
Check around the unit’s seams and gaskets for signs of refrigerant leaks, which can compromise cooling performance. If you suspect a leak, consult a professional technician, as refrigerant handling requires specialized tools and knowledge.
7. Test the Thermostat
Calibrate your thermostat regularly to ensure it’s providing accurate readings. An inaccurate thermostat can cause uneven cooling and wasted energy on top of making your RV experience more uncomfortable.
8. Check the Fan Blades
Inspect the fan blades for dirt buildup and damage. Once clean, ensure that there aren’t any broken or misaligned blades, as they can cause unnecessary strain on the motor. If there are, address them promptly.
Tips for Troubleshooting Common Issues on the Road
Even if you know how to properly maintain your RV air conditioner, the time will come when you’ll experience some issues with it on the road. You should know how to deal with these issues as they arise. For example, if your AC isn’t cooling, first set the thermostat to the correct temperature. If that’s all good, check for dirty or clogged air filters that might be restricting airflow. Additionally, ensure your RV is receiving adequate voltage, as low voltage can prevent the compressor from working properly.
If you’re experiencing excessive noise from your air conditioner, loose or damaged fan blades might be the cause. Debris inside the unit can also cause rattling sounds. If you hear a grinding noise, worn-out motor bearings could be the issue and may need lubrication or replacement.
Water leaks inside the RV are another common problem. Be sure to check the drain pan and line for clogs or overflow, as these can lead to leaks. It’s also a good idea to inspect the ceiling seals around the AC unit, as cracked or misaligned ones can allow water to drip inside. If your AC doesn’t turn on at all, start by checking the circuit breaker and resetting it if necessary. Loose or damaged power cables could also be the culprit, so make sure they’re secure and intact.
For any troubleshooting, always refer to your RV air conditioner’s manual for specific guidance to ensure safety and accuracy. With a little care, you can get your AC back to keeping your RV cool and comfortable.
Recommendations for Professional Servicing

While you can resolve some issues on your own, there are situations where professional servicing is the best option to ensure your RV air conditioner operates efficiently. For instance, refrigerant leaks require specialized training to repair, and electrical issues like flickering lights or frequent circuit breaker trips need expert attention. If troubleshooting steps don’t resolve persistent issues, calling a professional is often the smartest choice.
Finding a reliable RV service center can feel daunting, but there are several ways to ensure you choose the right one. Start by seeking recommendations from fellow RV enthusiasts who have had positive experiences with service providers. Also, online reviews on platforms like Google or Yelp can help you identify highly rated centers. Regardless of how you find them, be sure to look for centers with certified technicians trained to handle RV-specific systems.
Be sure to consider the cost of these services as well. While pricing shouldn’t be your main consideration, you must compare quotes to help you avoid overpaying. If you want to save even more, be sure to look into buying your RV air conditioner parts online before going to a service center. That way, you don’t have to pay the inflated prices that many places tend to charge.



Comments (0)
There are no comments for this article. Be the first one to leave a message!