
RV living offers unmatched freedom and exploration, but just like any vehicle, an RV requires regular maintenance to keep everything running smoothly. Among the many components of an RV, the power converter plays a critical role in ensuring your electrical systems function properly.
Over time, dirt, dust, and debris can build up in the converter, reducing its efficiency and lifespan. This guide walks you through everything you need to know about safely cleaning your RV power converter.
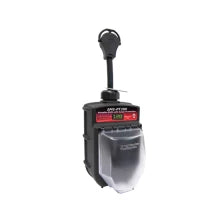
What Is an RV Power Converter and Why Does It Need Cleaning?
An RV power converter is the device responsible for converting 120-volt AC (alternating current) power from external hookups or your RV’s generator into 12-volt DC (direct current) power. This lower voltage is essential for operating many of your RV’s internal systems, such as lights, water pumps, and fans, without overloading them.
Power converters naturally accumulate dust and debris, especially if your RV is parked or used in outdoor environments with significant exposure to dirt. This buildup traps heat within the converter, causing it to overheat and potentially fail. Cleaning your power converter regularly ensures it operates efficiently, prevents overheating, and extends its lifespan.
Safety Precautions Before Cleaning
Handling electrical components always involves a certain level of risk. Before you jump into cleaning your RV power converter, it’s crucial to be careful with how you go about it. Follow these critical safety steps to protect yourself and your equipment from harm.
Disconnect the Power Supply
Always disconnect your RV from any power source before performing maintenance. This includes both the 120-volt AC shore power and the 12-volt DC battery system. Unplug the shore power cable and turn off the main power switch to ensure there is no electricity flowing into the converter.
Allow the Converter To Cool Down
If your RV has been running recently, give the converter time to cool down before you touch it. Power converters can get very hot during operation, and handling it immediately afterward could lead to burns or other injuries.
Wear Protective Gear
Equip yourself with the proper safety gear, such as insulated gloves and eye protection. This helps protect you from accidental contact with electrical components or debris during cleaning.
Work In a Well-Ventilated Area
To avoid inhaling dust or potential fumes, ensure that you have adequate ventilation in your workspace. This usually means placing your RV in an open outdoor area or a well-aired garage before you start working.
Read the Manual
Every RV power converter has manufacturer’s manual with specific maintenance and safety instructions. Consult the guide for any additional information you might need to know about accessing and cleaning your particular model. Every power converter is different, and some might have special rules dictating how to handle it. Taking five minutes to read the manual can save hours of frustration later.

Step-by-Step Guide To Cleaning Your RV Power Converter
With safety precautions in place, you’re ready to clean your power converter. In order to ensure that you clean your RV power converter safely and correctly, follow these step-by-step instructions:
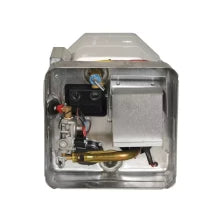
Step 1: Remove Access Panels
Start by locating your RV’s power converter, usually found near the breaker box. Using a screwdriver, carefully remove any panels or covers that give you access to the converter. Keep track of screws and components by putting them in a bag together for easy reassembly later.
Step 2: Inspect the Converter
With the converter exposed, check thoroughly for visible signs of dirt, dust, or damage. Look for corrosion, burnt wires, or other irregularities. If you notice significant damage, consider consulting a professional technician rather than proceeding with cleaning.
Step 3: Use Compressed Air
To remove dust and debris from the power converter, use a can of compressed air. Hold the nozzle a few inches away from the components and use short, controlled bursts of air to blow out debris from all openings, vents, and crevices. Keep the can upright during the process to prevent liquefied gas from leaking out.
Step 4: Wipe With a Soft Cloth
For areas with heavier dirt buildup, use a lint-free, slightly damp microfiber cloth to wipe down the surfaces gently. Avoid using excessive moisture, as excess water can damage electrical components. If you want to avoid water entirely, you can dampen the cloth with a small amount of isopropyl alcohol, which can actually be more effective in many cases.
Step 5: Check Fan Vents and Filters
Many converters include a cooling fan and vents to manage heat. Over time, these vents can become clogged with debris, restricting airflow. Use compressed air or a soft brush to clean these vents and ensure the fan blades are dust-free for optimal performance.
Step 6: Reassemble the Converter
After cleaning, carefully reattach the access panel or cover. Double-check that you’ve securely attached all screws. Next, reconnect the power supply by plugging in the 12-volt batteries and then connect to an external shore power source.
Step 7: Test the System
With everything back in place, it’s time to turn the power back on and test your RV’s systems to ensure the converter is functioning properly. Check the lights, appliances, and any other components that rely on the 12-volt DC power supply to ensure it’s functioning properly.

What To Do If Cleaning Won’t Save It
Sometimes, even routine cleaning may not resolve issues with your RV power converter. If you notice persistent problems, such as flickering lights, slow battery charging, or excessive heat, it may indicate that your converter is failing. Here’s what to do in such cases.
Assess the Severity of the Problem
Start by using a multimeter to measure the voltage output of your power converter. Ensure you’ve connected your RV to a reliable power source, and check that the multimeter settings are correct for measuring voltage. Compare the reading to the converter’s specifications. A significantly lower or unstable voltage reading typically indicates that the converter is malfunctioning and may need attention.
Seek Professional Help
If cleaning connections or performing basic troubleshooting doesn’t resolve the issue, it’s time to consult a professional RV technician. They have the tools and expertise to accurately identify the root cause of the problem, whether it’s an internal fault in the converter, an electrical issue elsewhere in the system, or something more complex. A professional will also be able to advise you on whether the problem is repairable or if a full replacement is necessary.
Consider a Replacement Converter
If you need to replace your RV power converter, choose a high-quality model that matches your RV’s specific electrical requirements. Look for modern RV power converters with better energy efficiency, enhanced safety mechanisms, and quieter cooling fans.
These upgrades not only ensure more reliable power but can also be a long-term improvement for your RV’s electrical system. Properly installing and maintaining the new converter will help prevent future issues, so be sure to follow this guide when caring for your new power converter.


Comments (0)
There are no comments for this article. Be the first one to leave a message!